Create Calendar Table with Power Query
How to create calendar table by using power query
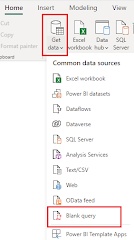
Step 1: Click on Get Data
Step 2: Select Blank Query
Step 3: Click on Advance Editor in the Home Tab of Power Query Editor


let
StartDate = #date(2024, 1, 1),
EndDate = #date(2024, 12, 31),
NumberOfDays = Duration.Days(EndDate - StartDate),
DateList = List.Dates(StartDate, NumberOfDays+1, #duration(1, 0, 0, 0)),
TableFromList = Table.FromList(DateList, Splitter.SplitByNothing())
in
TableFromList
If you want a calendar for a different range, modify the
StartDate and EndDate variables accordingly.Step 5: Click "Done" in the Advanced Editor.
Step 6: You may want to add additional columns to your calendar table, such as Year, Month, Quarter, Day of Week, etc.
Here's an example of how to add a Year column:
In Power Query Editor, select the "Date" column.
Go to the "Add Column" tab.
Click on "Year" to add a new column with the year information.
Go to the "Add Column" tab.
Click on "Year" to add a new column with the year information.

Click "Close & Apply" to load the final calendar table into Power BI
Your calendar table is now ready for use. You can use it in relationships with other tables or create visualizations based on date-related analysis.
Please leave comments If you have any questions and issues on Power BI DAX I am here to help you.
Happy Learning 😊
Comments
Post a Comment